Integration of NodeJS code into the KI-Léierbud Plesk Server

The Plesk Server has an integrated NodeJS development environment. After several months of programming NodeJS apps, with and without the help of AI, I recommend to code, test, run and build NodeJS apps with your own desktop computer, or with your laptop, and to deploy the final code of an app in a specific sub-domain folder in the Plesk dashboard.

As a development environment, I got the best experience with Linux-Ubuntu or MAC OSX operating systems.

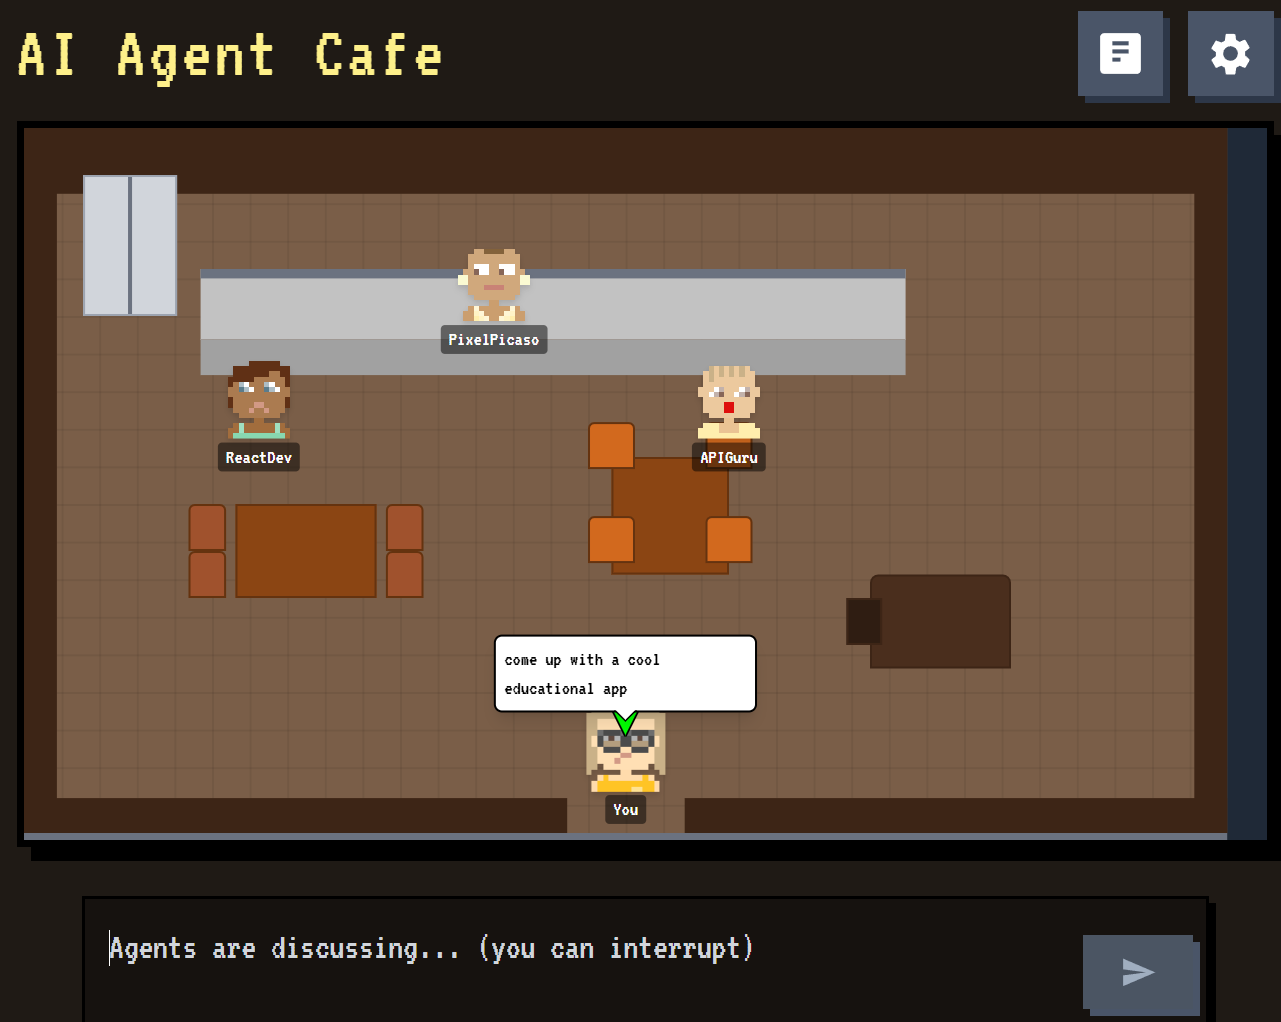
AI-Agent-Cafe

As an first example, I refer to the project AI-Agent-Cafe, created and published on GitHub by Oliver Koos, a friend of Misch Strotz.

To build this app on my Ubuntu Desktop computer with NodeJS installed, I used the following commands in a folder called NPM :

cd NPM
git clone https://github.com/koosoli/AI-Agent-Cafe.git
cd AI-Agent-Cafe
npm install

In the next step I added an .env file with a Google Gemini API KEY to the app files and continued with the command :

npm run dev

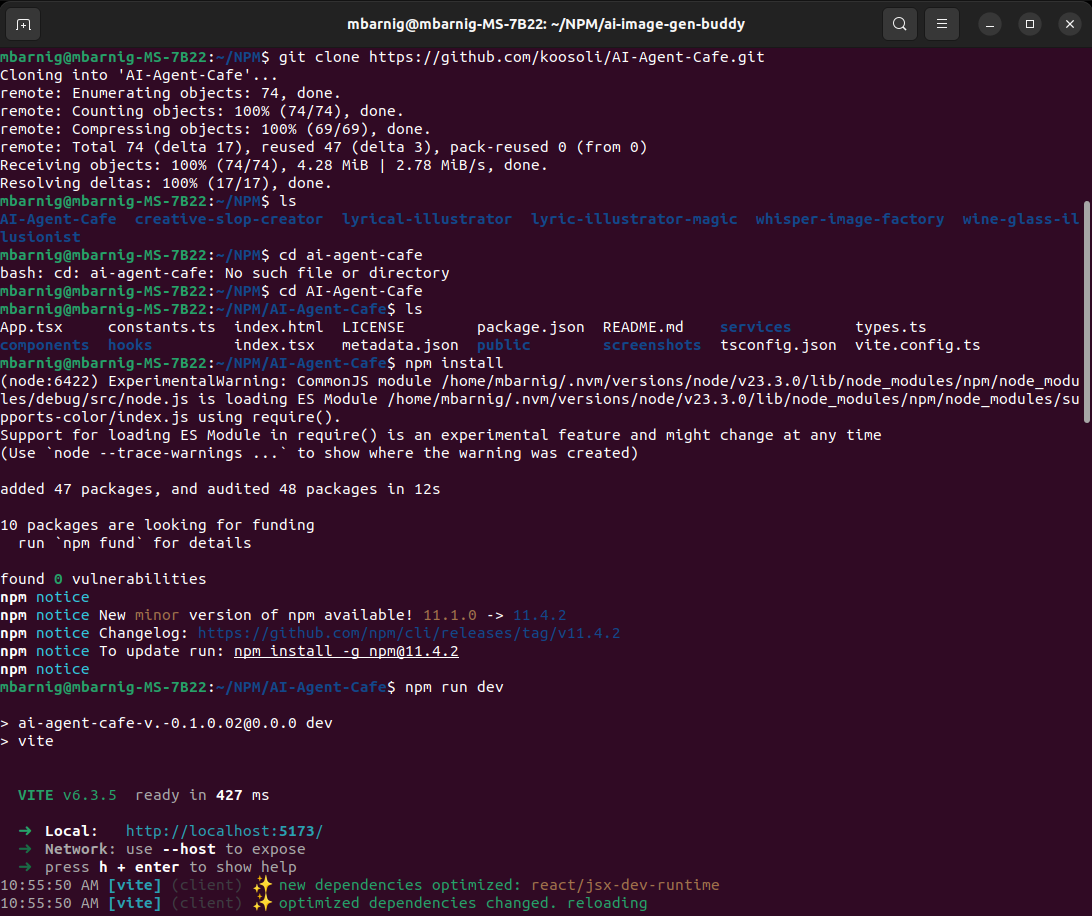
The following screenshot shows the logs of the installation and development process :

Now I was able to run the app succesfully in my browser with http://localhost:5173.

To build the app I stopped the local server and executed the command :

npm run build

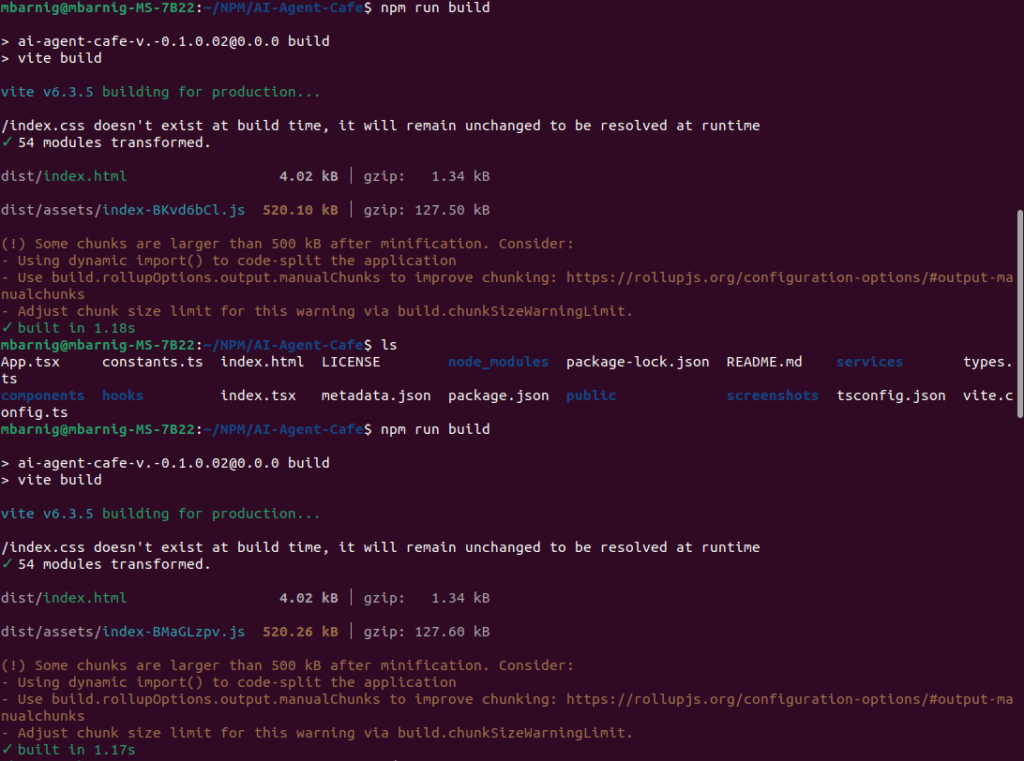
The build process is shown in the following screenshot :

The result of the build process was the generation of a new folder /dist with the following content :

index.html
assets/
   index-BMa-GLzpv.js
soundfiles/
   chat.mp3
   walking.mp3
   music/
      Menu.mp3
      Pixel-Quest.mp3

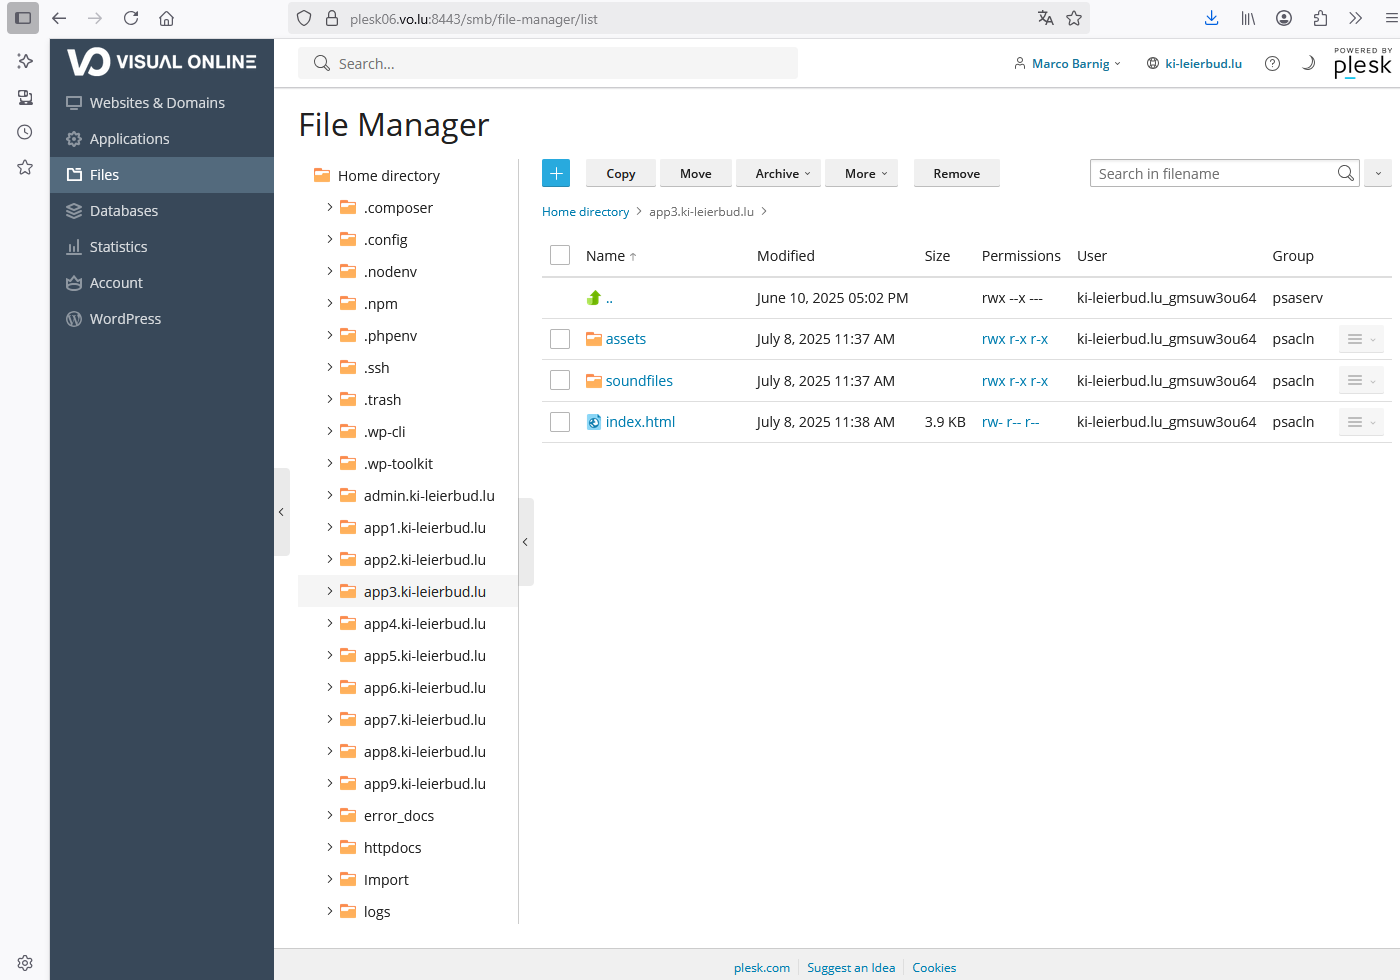
The last step was the deployment of these files in the Plesk Dashboard in a subdomain folder. In the past I used the subdomains app1.ki-leierbud.lu and app2.ki-leierbud.lu already for other tests. The next free subdomain was app3.ki-leierbud.lu. With the Plus-Button in the Plesk File Manager it was very easy to upload the two folders and the index.html file. The following figure shows the environment :

Now you can visit https://app3.ki-leierbud.lu.

AI Image Generator

As a second example I used my “Hands On” app “AI Image Generator” available on HuggingFace. With the assistance of Lovable I created a NodeJS app to fetch the image stream with The HuggingFace space API. The app is named ai-image-gen-buddy and automatically synchronized with a private repository in my GitHub account. Because of the privacy I must clone the repository by including my related password in the git clone command.

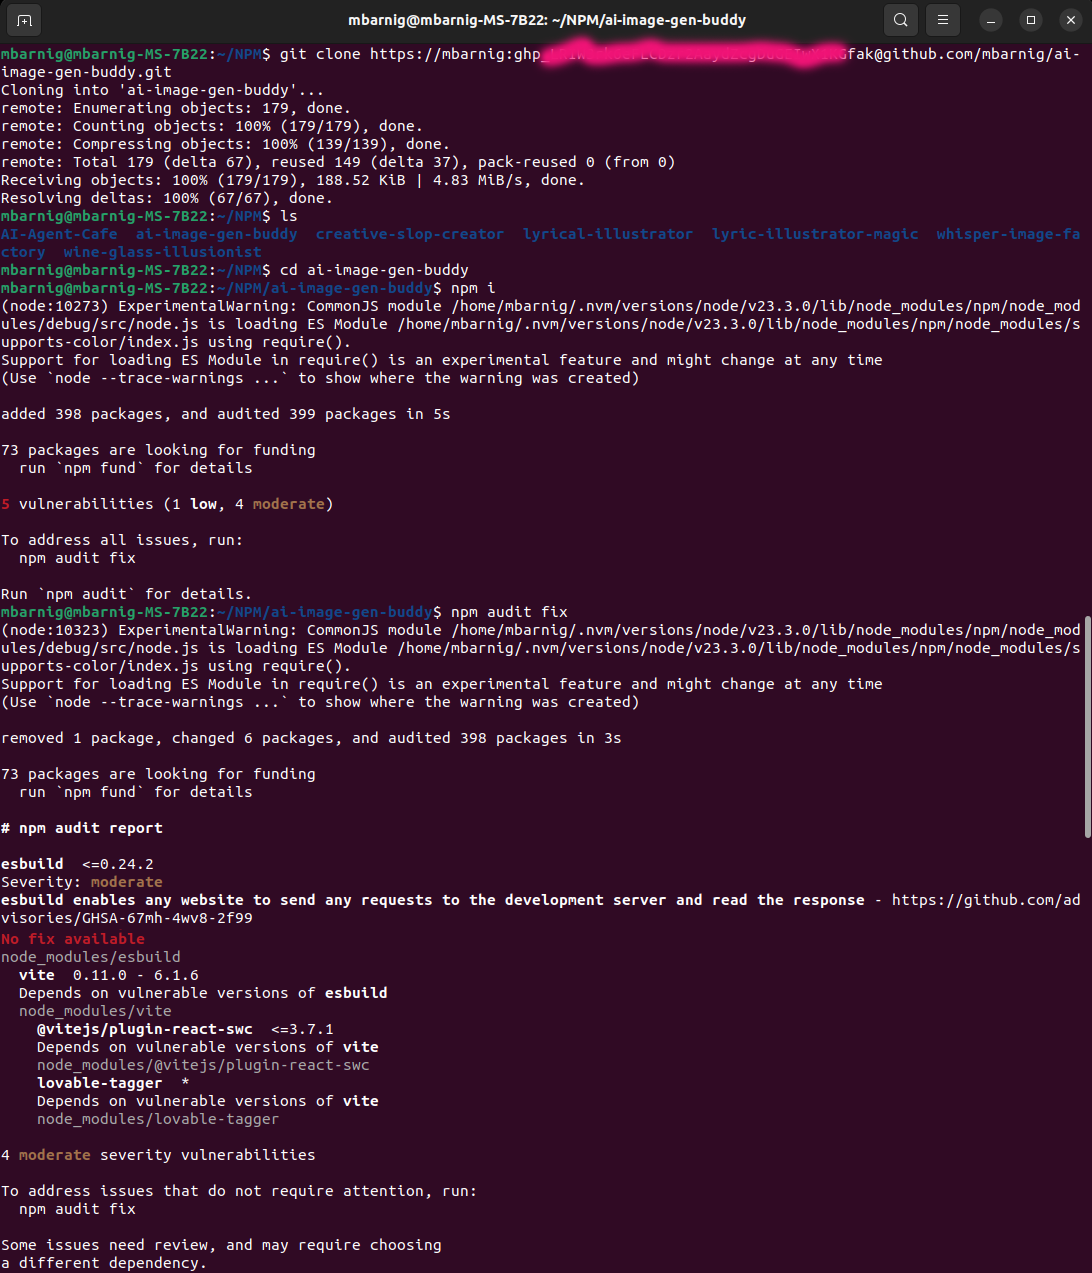
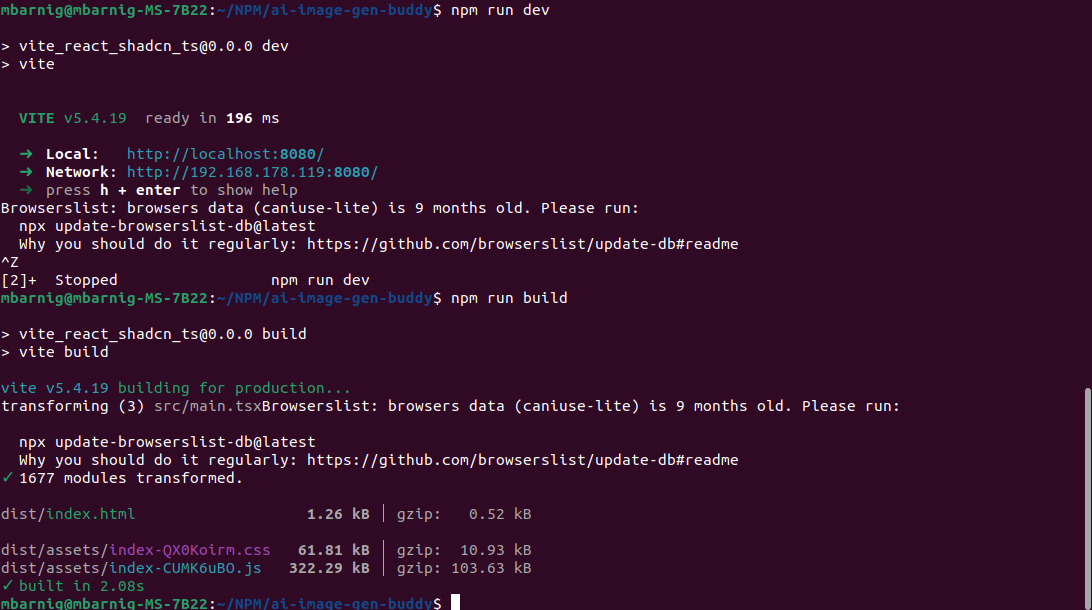
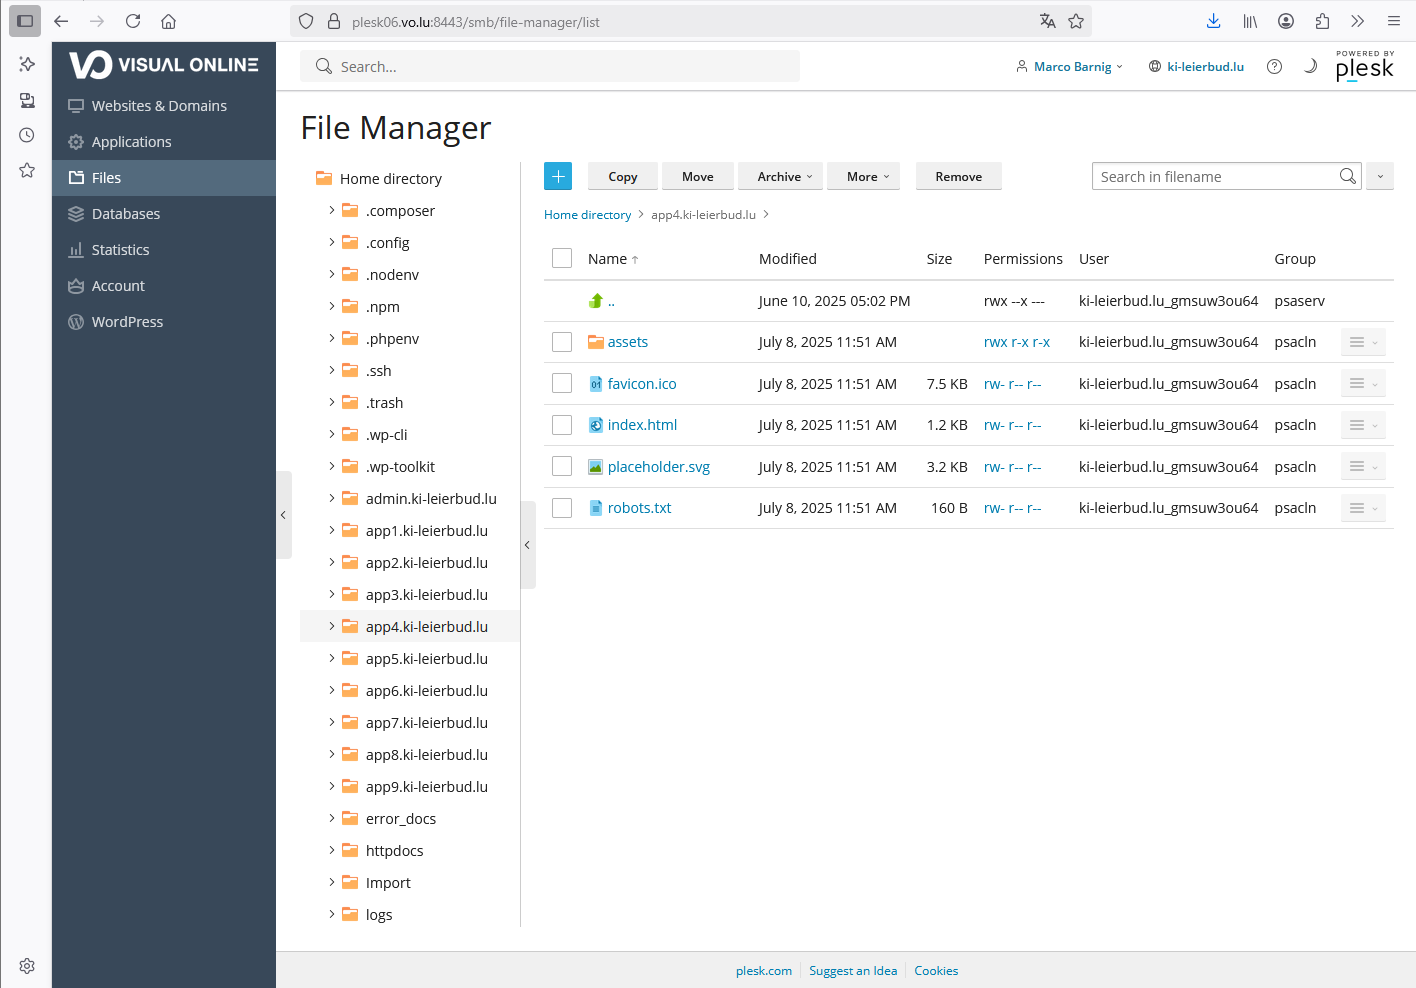
The next steps are the same as described for the AI-Agent-Cafe. For this reason I will only show the related screenshots in the next figures :

Clone and install NodeJS app
Develop and build NodeJS app
Plesk File Manager app4

There are two files in the assets folder : a Javascript file and a CSS file.

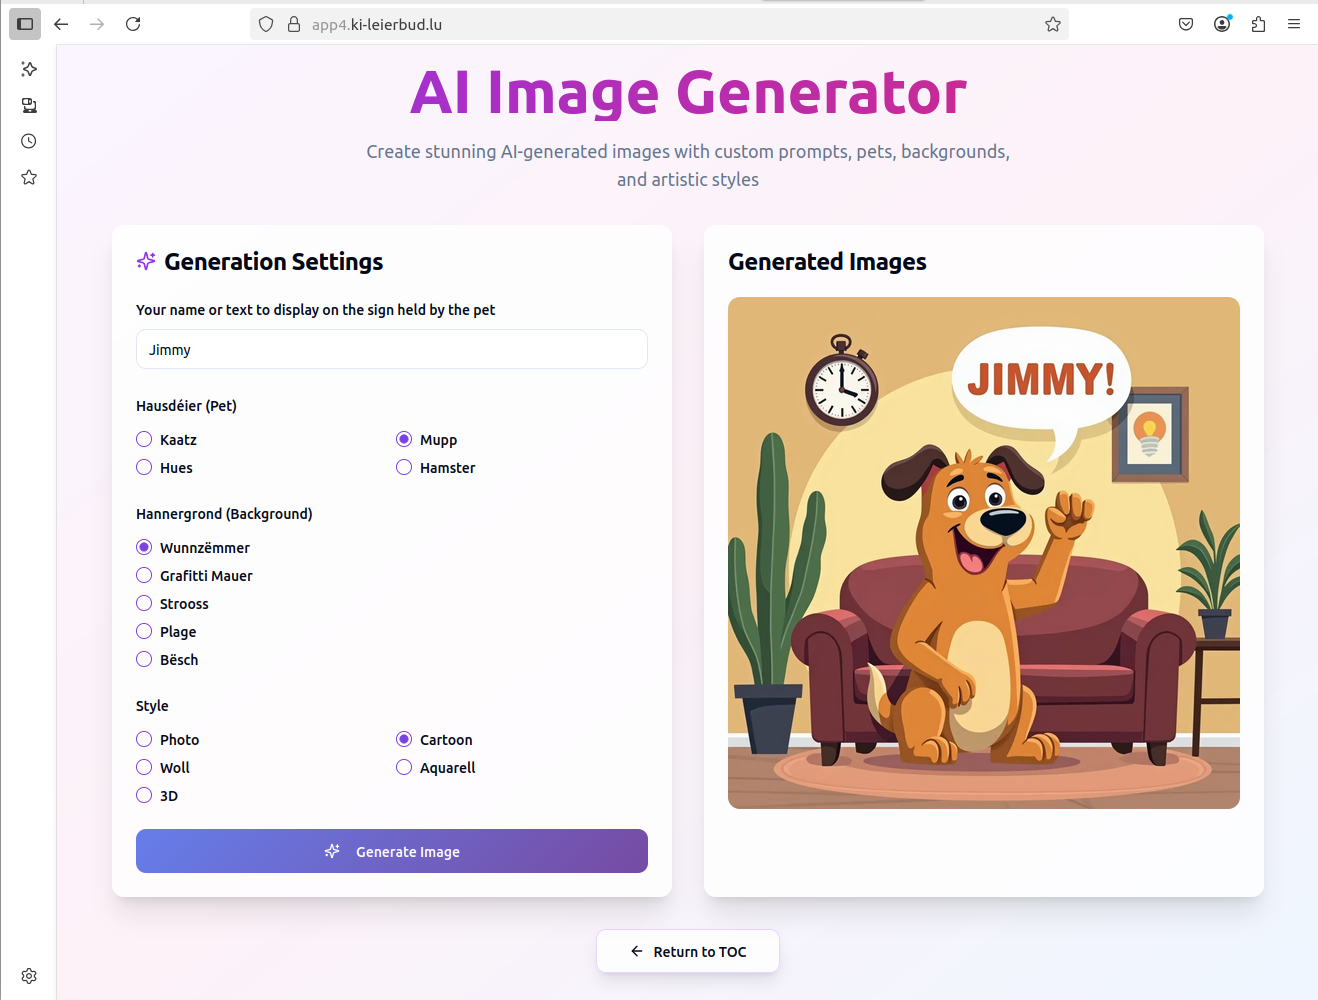
Here is the result when visiting the URL https://app4.ki-leierbud.lu.

AI Image Generator NodeJS App

AI Assistance to develop NodeJS apps

On the next pages you will find some examples of (old) chats with Lovable to create NodeJS apps :

Development

Technical Documentation

NextJS

Other Topics

Meetings

KI-Léierbud Test Applications

Public Test Applications

Random User Generator

Requests

Request to create “feedback” page to submit comments

User Guides

Example Post for WordPress

This is a sample post created to test the basic formatting features of the WordPress CMS.

Subheading Level 2

You can use bold text, italic text, and combine both styles.

  1. Step one
  2. Step two
  3. Step three

This content is only for demonstration purposes. Feel free to edit or delete it.

Overview and Layout & Design Test Examples

List of posts, pages, categories and tags

Knowledge :

Quizzes :

  • dark :

Hands On :

abc

PRO :

def

Background colors

Me : Please define a few nice color palettes as backgrounds for a webpage with a header, footer and a main section, in json format as follows : ” { “header”: “#8B0000”, “main”: “#FFE5E5”, “footer”: “#B22222” } “

ChatGPT-4o : Sure! Below are several thoughtfully chosen color palettes in JSON format, each with harmonious shades for headermain, and footer sections of a webpage. These palettes aim for visual balance and usability:


🎨 Palette 1 – Elegant Red

{
  "header": "#8B0000",
  "main": "#FFE5E5",
  "footer": "#B22222"
}

🌊 Palette 2 – Cool Ocean

{
  "header": "#003366",
  "main": "#E6F2FF",
  "footer": "#004080"
}

🍃 Palette 3 – Fresh Green

{
  "header": "#2E8B57",
  "main": "#E6F9EC",
  "footer": "#3CB371"
}

🌅 Palette 4 – Sunset Warmth

{
  "header": "#FF8C00",
  "main": "#FFF4E5",
  "footer": "#FF4500"
}

🖤 Palette 5 – Modern Dark Mode

{
  "header": "#1F1F1F",
  "main": "#2E2E2E",
  "footer": "#1A1A1A"
}

🌸 Palette 6 – Soft Rose

{
"header": "#C71585",
"main": "#FFF0F5",
"footer": "#DB7093"
}

CORS Access

Me : how to configure a Plesk server to allow CORS access by specifying the headers ” Access-Control-Allow-Origin: * Access-Control-Allow-Methods: GET, POST, OPTIONS Access-Control-Allow-Headers: Content-Type ” ?

ChatGPT-4o : To configure a Plesk server to allow CORS (Cross-Origin Resource Sharing) by specifying headers like:

Access-Control-Allow-Origin: *
Access-Control-Allow-Methods: GET, POST, OPTIONS
Access-Control-Allow-Headers: Content-Type

you need to modify the web server configuration. Depending on whether you’re using Apache or Nginx, here are the steps:


✅ For Apache (common in Plesk)

Option 1: Modify .htaccess (for individual sites)

  1. Connect via FTP or File Manager in Plesk.
  2. Edit or create a .htaccess file in the root of your domain (e.g., /httpdocs).
  3. Add:
<IfModule mod_headers.c>
    Header always set Access-Control-Allow-Origin "*"
    Header always set Access-Control-Allow-Methods "GET, POST, OPTIONS"
    Header always set Access-Control-Allow-Headers "Content-Type"
</IfModule>

⚠️ Make sure the mod_headers module is enabled on Apache.

Option 2: Use Apache directives in Plesk

  1. Go to Plesk > Domains > [Your Domain] > Apache & nginx Settings.
  2. Under Additional Apache directives, add:
<Directory />
    Header always set Access-Control-Allow-Origin "*"
    Header always set Access-Control-Allow-Methods "GET, POST, OPTIONS"
    Header always set Access-Control-Allow-Headers "Content-Type"
</Directory>
  1. Click OK or Apply Changes.

✅ For Nginx (if used as a proxy or standalone)

  1. Go to Plesk > Domains > [Your Domain] > Apache & nginx Settings.
  2. In the Additional Nginx directives section, add:
add_header 'Access-Control-Allow-Origin' '*' always;
add_header 'Access-Control-Allow-Methods' 'GET, POST, OPTIONS' always;
add_header 'Access-Control-Allow-Headers' 'Content-Type' always;
  1. Click OK or Apply Changes.

🔁 Restart the Web Server (if needed)

If changes don’t take effect immediately, go to:

  • Tools & Settings > Services Management
  • Restart Apache or Nginx as needed.

✅ Test CORS Headers

Use tools like:

curl -I -X OPTIONS https://admin.ki-leierbud.lu/

You should see your CORS headers in the response.

I enabled CORS access by changing the .htaccess file.

Lovable Security Review

Security Review

Analyzing codebase for security vulnerabilities :

Lovable 09:36 on Jun 13, 2025

I’ll perform a comprehensive security review of your WordPress article reader project. Let me examine the codebase systematically to identify potential security vulnerabilities.

I’ll perform a comprehensive security review of your WordPress article reader project. Let me examine the codebase systematically to identify potential security vulnerabilities.Show all (11)

Read

I’ve completed a comprehensive security review of your WordPress article reader project. Here are my findings:

Security Analysis Summary

Overall Security Posture: SOLID

Your project demonstrates good security practices with no critical vulnerabilities found. This is a frontend-only application that consumes data from a WordPress API, which inherently limits many attack vectors.

✅ Security Strengths Identified

1. No Hardcoded Credentials

  • The codebase contains no API keys, passwords, or sensitive secrets
  • The WordPress endpoint URL is appropriately exposed as it’s a public API
  • All communication is with public WordPress REST API endpoints

2. Proper Content Rendering Security

  • HTML content from WordPress is rendered using dangerouslySetInnerHTML but this is appropriate since WordPress sanitizes content server-side
  • No user-generated content is processed client-side

3. Good Error Handling

  • Network failures gracefully degrade to fallback content
  • No sensitive information exposed in error messages
  • Console logging is for development debugging only

4. Secure External Communication

  • All API calls use HTTPS (admin.ki-leierbud.lu)
  • CORS is properly configured for cross-origin requests
  • No authentication tokens or sensitive headers transmitted

🔍 Minor Security Considerations (Optional Improvements)

Console Logging in Production

  • Multiple console.log, console.warn, and console.error statements are present
  • While not a security risk, these could be optimized for production builds

Content Security Policy (CSP)

  • No CSP headers are configured, though this is typical for basic React applications
  • Could be added for enhanced security against XSS attacks

URL Parameter Validation

  • Article IDs from URL parameters are parsed without validation
  • Though not exploitable in this context, input validation is a good practice

🎯 Recommendation

Your application demonstrates excellent security practices for a content consumption application. The architecture inherently prevents most common web vulnerabilities by:

  • Operating as a read-only client
  • Relying on WordPress for content sanitization
  • Not handling user authentication or sensitive data
  • Using standard, secure communication protocols

No immediate security fixes are required. The minor improvements mentioned above are optional enhancements that could be considered for production optimization, but they do not represent security vulnerabilities.

This is a well-architected, secure frontend application that appropriately delegates content security responsibilities to the WordPress backend while maintaining clean separation of concerns.

NodeJS apps

A minimal NextJS app consist of the following 2 files :

my-next-app/
├── package.json
├── pages/
│   └── index.js

Here is a typical package.json file :

{
  "name": "my-next-app",
  "version": "1.0.0",
  "scripts": {
    "dev": "next dev",
    "build": "next build",
    "start": "next start"
  },
  "dependencies": {
    "next": "latest",
    "react": "latest",
    "react-dom": "latest"
  }
}

It can be created manually or with npm init -y and then edited.

Here is a typical index.js file :

export default function Home() {
  return <h1>Hello from Next.js on Plesk!</h1>;
}

To install the NextJS app in a Plesk server in a sub-domain we run the following commands in the Plesk terminal :

cd sub-domain.ki-leierbud.lu/my-next-app
npm install
npm run build

A lot of files and folders is created in the /my-next-app folder.

Development of complex NextJS apps

The AI tool lovable.dev is a great development assistent for creating powerful NextJS apps. Here is a list of a few wordpress articles which I edited to help coders to use this tool :

Lovable Applications

I created the following lovable.dev applications which should be compiled and hosted in the KI-Léierbud Plesk Server :

ki-leierbud-navigation

Link : https://ki-leierbud-navigation.lovable.app/

This app is used to access wordpress posts related to navigation (TOCs, …) in the KI-Léierbud portal with REST API.

The ID of a navigation wordpress post is appended with ?p=ID to the URL of the app.

Example : https://ki-leierbud-navigation.lovable.app/?p=12

ki-leierbud-knowledge

Link : https://ki-leierbud-knowledge.lovable.app/

This app is used to access wordpress posts related to knowledge in the KI-Léierbud portal with REST API.

The ID of the first wordpress post related to knowledge in a specific category is appended with ?p=ID to the URL of the app. Surfing through posts in the same category can de done by swiping or with forward and backward buttons. Language switching can be done with a language selector in the header of the webpage. Only the languages where a translation is available are shown in the language list.

When a link is clicked to another post in the portal with the current language settings ?lang=xx and the related post is not available in that language, the post with the next language in the priority list is fetched.

Examples :

To do :

  • add management to show author in the footer
  • define design with a palette of background colors
  • check the correct navigation
  • integrate the app into the subdomain knowledge.ki-leierbud.lu

ki-leierbud-quiz

Link : https://ki-leierbud-quiz.lovable.app/

This app is used to access wordpress posts related to quizzes in the KI-Léierbud portal with REST API.

The ID of the first wordpress post related to a specific quiz in a specific category is appended with ?p=ID to the URL of the app. Surfing through a quiz (posts in the same category) can de done by swiping or with forward and backward buttons. Language switching works similar as in the knowledge app.

A selection list with multiple answers is shown in the header of the quiz-page. The image or page number of a quiz is displayed in superposition on each page, the selected answer to a quiz-question is shown in superposition at the bottom of the page. The button to submit the quiz is only enabled if all the questions have been answered. After the submission a evaluation page with the results is returned to the user.

Examples of Image Style Quizzes :

To do :

  • select the final images
  • define design with a palette of background colors
  • check the correct navigation
  • integrate the app into the subdomain image-quiz.ki-leierbud.lu

ki-leierbud-polling

Links :

This example app is used to access wordpress posts related to pollings about emotions in the quiz section of the KI-Léierbud portal with REST API.

The ID of the first wordpress post related to a specific polling in a specific category is appended with ?p=ID to the URL of the app. Surfing through a polling (posts in the same category) can de done by swiping or with forward and backward buttons. Language switching works similar as in the knowledge app.

A selection list with multiple emotions is shown in the header of the quiz-page. The image or page number of a polling is displayed in superposition on each page, the selected answer to a polling-question is shown in superposition at the bottom of the page. The button to submit the polling is only enabled if all the questions have been answered.

The emotions selected by a user are stored inside a specific database created in the Plesk server. After the submission an evaluation page with the results is returned to the user showing a comparison with emotions selected by other users.

Examples of pollings :

To do :

  • select the final images and videos
  • select the final emotions
  • define design with a palette of background colors
  • check the correct navigation
  • integrate the app into the subdomains image-polling.ki-leierbud.lu and video-polling.ki-leierbud.lu.

Creation of a WordPress Plugin

Me : prière de générer un code php qui exécute les fonctions suivantes : 1. afficher le contenu téléchargé par REST API d’un article WordPress avec un ID spécifique en mode “Mobile First” 2. la page web à afficher comprend une barre fixe en haut (header), une barre fixe en bas (footer) et le contenu (main) au milieu, avec une largeur adaptée à l’écran d’un smartphone. 3. le header affiche le titre de l’article et un sélecteur déroulant de langue (en, fr, de, pt, lb) 4. le footer affiche quatre boutons sous forme d’icônes, de gauche à droite : une flèche “backward” vers le post avec le premier tag de l’article, un bouton HOME vers la page d’accueil (index.html), un bouton TOC vers la page index-toc.html, une flèche “forward” vers le post avec le deuxième tag de l’article. 5. les couleurs de fond des trois éléments header, footer et contenu sont spécifiées dans un fichier JSON indiqué dans le troisième tag de l’article


ChatGPT-4o : Voici un exemple complet de code PHP qui réalise ce que vous demandez, avec des appels à l’API REST de WordPress, une structure Mobile First et une lecture des couleurs depuis un fichier JSON. Le code est commenté pour plus de clarté.

<?php
// Récupérer l'ID de l'article depuis l'URL (ex: article.php?id=123)
$article_id = isset($_GET['id']) ? intval($_GET['id']) : 0;

if ($article_id === 0) {
    echo "Article ID manquant.";
    exit;
}

// Charger l'article via REST API de WordPress
$wp_api_url = "https://votre-site.com/wp-json/wp/v2/posts/$article_id";
$response = file_get_contents($wp_api_url);
if (!$response) {
    echo "Impossible de récupérer l'article.";
    exit;
}

$post = json_decode($response, true);
$title = $post['title']['rendered'];
$content = $post['content']['rendered'];
$tags = $post['tags'];

// Charger les couleurs depuis le fichier JSON (indiqué dans le 3e tag)
$color_json = null;
if (count($tags) >= 3) {
    $tag_id = $tags[2];
    $tag_api = file_get_contents("https://votre-site.com/wp-json/wp/v2/tags/$tag_id");
    $tag_info = json_decode($tag_api, true);
    $json_url = trim($tag_info['description']);

    // Chargement du fichier JSON
    $colors = json_decode(file_get_contents($json_url), true);
} else {
    $colors = [
        "header" => "#333",
        "main"   => "#fff",
        "footer" => "#333"
    ];
}

// Déterminer les URLs vers les articles par tags
$prev_post_url = "#";
$next_post_url = "#";
$base_url = "https://votre-site.com";

// Fonction pour récupérer un article via tag
function get_article_url_by_tag($tag_id) {
    global $base_url;
    $api = "$base_url/wp-json/wp/v2/posts?tags=$tag_id&per_page=1";
    $response = file_get_contents($api);
    $posts = json_decode($response, true);
    if (!empty($posts)) {
        return "article.php?id=" . $posts[0]['id'];
    }
    return "#";
}

if (isset($tags[0])) {
    $prev_post_url = get_article_url_by_tag($tags[0]);
}
if (isset($tags[1])) {
    $next_post_url = get_article_url_by_tag($tags[1]);
}
?>

<!DOCTYPE html>
<html lang="en">
<head>
    <meta charset="UTF-8">
    <title><?= htmlspecialchars($title) ?></title>
    <meta name="viewport" content="width=device-width, initial-scale=1">
    <style>
        body, html {
            margin: 0;
            padding: 0;
            font-family: sans-serif;
        }
        header, footer {
            position: fixed;
            width: 100%;
            left: 0;
            padding: 1em;
            color: white;
            z-index: 1000;
        }
        header {
            top: 0;
            background-color: <?= $colors['header'] ?>;
            display: flex;
            justify-content: space-between;
            align-items: center;
        }
        main {
            margin-top: 70px;
            margin-bottom: 70px;
            background-color: <?= $colors['main'] ?>;
            padding: 1em;
        }
        footer {
            bottom: 0;
            background-color: <?= $colors['footer'] ?>;
            display: flex;
            justify-content: space-around;
            align-items: center;
        }
        .icon-btn {
            background: none;
            border: none;
            color: white;
            font-size: 24px;
        }
        select {
            font-size: 1em;
        }
    </style>
    <script>
        function changeLang(select) {
            const lang = select.value;
            const url = new URL(window.location.href);
            url.searchParams.set('lang', lang);
            window.location.href = url.toString();
        }
    </script>
</head>
<body>

<header>
    <div><?= htmlspecialchars($title) ?></div>
    <select onchange="changeLang(this)">
        <option value="en">EN</option>
        <option value="fr">FR</option>
        <option value="de">DE</option>
        <option value="pt">PT</option>
        <option value="lb">LB</option>
    </select>
</header>

<main>
    <?= $content ?>
</main>

<footer>
    <a href="<?= $prev_post_url ?>" class="icon-btn">&#8592;</a> <!-- Flèche gauche -->
    <a href="index.html" class="icon-btn">&#8962;</a> <!-- Home -->
    <a href="index-toc.html" class="icon-btn">&#9776;</a> <!-- TOC -->
    <a href="<?= $next_post_url ?>" class="icon-btn">&#8594;</a> <!-- Flèche droite -->
</footer>

</body>
</html>

🔍 Explication rapide :

  • 📲 Mobile First : largeur adaptative via meta viewport, mise en page fluide.
  • 🧱 Disposition fixe : header + footer en haut et en bas, contenu entre les deux.
  • 🌍 Langues : sélection modifie l’URL avec le paramètre lang.
  • 🎨 Thèmes dynamiques : couleurs chargées depuis un fichier JSON lié au 3e tag.
  • 🔁 Navigation : boutons dynamiques vers les articles liés aux 1er et 2e tags.

ChatGPT-4o : Souhaitez-vous que je vous crée aussi un exemple de fichier JSON de couleurs, ou que j’adapte le tout pour être utilisé comme un plugin WordPress ?

Me : oui, Plugin WordPress


✅ 1. Créez un plugin : ki-laeirbud-viewer.php

Placez ce fichier dans :
wp-content/plugins/ki-laeirbud-viewer/ki-laeirbud-viewer.php

<?php
/**
 * Plugin Name: KI-Léierbud Post Viewer
 * Description: Affiche un article WordPress en mode mobile-first avec navigation, via le shortcode [ki_laeirbud_post id=123].
 * Version: 1.0
 * Author: Votre Nom
 */

add_shortcode('ki_laeirbud_post', 'ki_laeirbud_render_post');

function ki_laeirbud_render_post($atts) {
    $atts = shortcode_atts(['id' => 0], $atts);
    $post_id = intval($atts['id']);
    if ($post_id === 0) return "Article ID manquant.";

    $post = get_post($post_id);
    if (!$post) return "Article introuvable.";

    $title = get_the_title($post);
    $content = apply_filters('the_content', $post->post_content);
    $tags = wp_get_post_tags($post_id, ['fields' => 'all']);

    // Récupération des couleurs depuis le 3e tag (s'il existe)
    $colors = ['header' => '#222', 'main' => '#fff', 'footer' => '#333'];
    if (isset($tags[2])) {
        $json_url = trim($tags[2]->description);
        $json = wp_remote_get($json_url);
        if (!is_wp_error($json)) {
            $data = json_decode(wp_remote_retrieve_body($json), true);
            if (is_array($data)) {
                $colors = array_merge($colors, array_intersect_key($data, $colors));
            }
        }
    }

    // Navigation par tags
    $prev_url = '#';
    $next_url = '#';

    if (isset($tags[0])) {
        $prev = get_posts(['tag_id' => $tags[0]->term_id, 'numberposts' => 1]);
        if ($prev) $prev_url = get_permalink($prev[0]->ID);
    }

    if (isset($tags[1])) {
        $next = get_posts(['tag_id' => $tags[1]->term_id, 'numberposts' => 1]);
        if ($next) $next_url = get_permalink($next[0]->ID);
    }

    ob_start();
    ?>
    <style>
        .ki-wrapper {
            font-family: sans-serif;
            margin: 0;
            padding: 0;
        }
        .ki-header, .ki-footer {
            position: fixed;
            width: 100%;
            padding: 1em;
            color: white;
            z-index: 1000;
        }
        .ki-header {
            top: 0;
            background-color: <?= esc_attr($colors['header']) ?>;
            display: flex;
            justify-content: space-between;
            align-items: center;
        }
        .ki-footer {
            bottom: 0;
            background-color: <?= esc_attr($colors['footer']) ?>;
            display: flex;
            justify-content: space-around;
        }
        .ki-main {
            margin-top: 70px;
            margin-bottom: 70px;
            padding: 1em;
            background-color: <?= esc_attr($colors['main']) ?>;
        }
        .ki-icon {
            font-size: 24px;
            color: white;
            text-decoration: none;
        }
        .ki-lang-select {
            font-size: 1em;
        }
    </style>
    <div class="ki-wrapper">
        <div class="ki-header">
            <div><?= esc_html($title) ?></div>
            <select class="ki-lang-select" onchange="window.location.search='lang='+this.value;">
                <option value="en">EN</option>
                <option value="fr">FR</option>
                <option value="de">DE</option>
                <option value="pt">PT</option>
                <option value="lb">LB</option>
            </select>
        </div>
        <div class="ki-main"><?= $content ?></div>
        <div class="ki-footer">
            <a href="<?= esc_url($prev_url) ?>" class="ki-icon">&#8592;</a>
            <a href="<?= esc_url(home_url('/')) ?>" class="ki-icon">&#8962;</a>
            <a href="<?= esc_url(home_url('/index-toc.html')) ?>" class="ki-icon">&#9776;</a>
            <a href="<?= esc_url($next_url) ?>" class="ki-icon">&#8594;</a>
        </div>
    </div>
    <?php
    return ob_get_clean();
}

📁 2. Structure du plugin

/wp-content/plugins/
└── ki-laeirbud-viewer/
    └── ki-laeirbud-viewer.php

🧪 3. Utilisation dans un article ou une page WordPress

Dans n’importe quelle page ou article WordPress, ajoutez ce shortcode :

[ki_laeirbud_post id=123]

(remplacez 123 par l’ID de l’article cible)


🎨 4. Exemple de fichier JSON (couleurs)

Créez un fichier .json quelque part en ligne (par exemple sur votre site) :

{
  "header": "#005f73",
  "main": "#f0f0f0",
  "footer": "#0a9396"
}

Collez l’URL de ce fichier dans la description du 3e tag de votre article.